Setting the action on your guitar is a simple enough adjustment that can drastically improve the way your guitar plays. A poorly set up guitar gives a difficult and inconsistent playing experience and this can rob the player of their incentive to play! We see a lot of instruments come through our shop that have never even had a basic set up, which is why put together this comprehensive guide.
In this series we're demonstrating skills all guitarists should have under their belt, so if you’re just joining us, please make sure you follow the steps to check your Truss Rod in Part 1 of our Guitar Setup Guide before you complete this chapter, as your Truss Rod and Guitar Action go hand in hand with one another.
Guitar Set Up EssentialsBelow are some tools you will need to complete your guitar set up, so be sure to pick up anything you’re missing. These are all great tools that will help you maintain your guitar for its lifetime, so well worth the investment now!
- Guitar Tuner
- Allen Keys (Hex Wrenches)
- Ruler
- Nut Files
- Strings
- String Cutters
- Fretboard Oil
- Fret Polish
- Cleaning Cloths
- Screwdriver
- Body Polish
- Workbench Mat
- Neck Rest
'Action' is the popular term for your guitar's string height. The action is the distance between the top of your fret and bottom of your guitar string and it largely determines the way your guitar plays. It's adjusted by making changes to the bridge of your guitar.

By adjusting the action we’re going to improve the general playability of the guitar, and get your guitar playing its best. Now it’s important to note that Action means different things to different players. If you’re playing slide guitar, then you’ll probably want to set your action higher than someone who wants to sweep pick, so bear in mind that a lot of adjusting your action is down to personal preference.
Low vs High ActionWhen player’s bring an electric guitar into our shop for a setup, the number one thing they request is a lower action. A lower action makes the guitar play easier and faster, so its understandable why this is desired by so many players. That said, some guitar greats like SRV preferred a higher action and what’s most important is how the guitar plays to YOU. Some players like to set their action the manufacturers recommend measurement, but in our humble opinion, you should forget exact measurements and tailor your action to your own preference. Each guitar will react differently, in much the same each player will, so while manufacturer standard measurements are a good starting point, you may be able to eke out a better performance with some experimentation beyond.

A ruler or string action gauge is a useful tool to have in setting up your guitar and will help you determine by how much you’ve adjusted the action. If you’re that way inclined, it’s essential to allow you to keep to the manufacturers recommended measurement. Where we have individually adjustable saddles you also need to take into account the radius of the neck, as you’ll need to set string heights differently to ensure you’re not causing fret buzz in the middle where the neck is slightly higher.
Fretboard RadiusFor the uninitiated, guitar fretboards aren’t flat (unless it’s a classical guitar, banjo, or some steel-string acoustics) they actually have a slight curve which varies depending on the make and model of the guitar. The reason the fretboard is curved is to aid playability, with some being pretty close to flat and others having a fairly visible curve to them. A flat fretboard radius will be better for single note playing and bending, whereas a more curved fretboard aids the fretting of chords, making them much more comfortable to play.

It’s key to make sure you make this adjustment with your guitar plugged in. An electric guitar with a low action will often be subject to string buzz when unplugged but this sound won’t necessarily translate through to your amplifier, which is why it’s best to make these adjustments with your amp on. Distortion can cover up string buzz even more, so we recommend using the clean channel, unless you're one of those dirt hounds that only uses the OD channel.
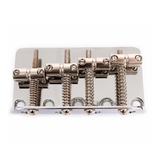
For Fender-style BridgesStrat style and modern Tele guitars have individually adjustable saddles, making them incredibly versatile in terms of string height adjustment. If you really wanted you could have a higher action on the treble strings for bending and soloing and a lower action on the bass strings for quicker, easier riffing, or the entire opposite, it’s really up to you. On a classic Tele Bridge you may find they have three saddles, two per string, with each side adjustable. These kinds of bridges still allow you to adjust the action, but you may have to compromise due to the slight lack of flexibility.
To adjust the height on a Strat or Tele Style bridge first measure with your ruler at the 12th fret and make a note, so you can be sure your adjustments are having an effect. Next adjust the two tiny bolts in your bridge saddles to move it higher or lower. Turning clockwise will raise the saddle and turning anti-clockwise will lower it. We recommend between a quarter or half turn each time to make it easy to reverse any changes and make sure the bridge saddle is at an even height, rather than leaning to one side of the other.

Re-tune to pitch then test all the notes on the fretboard to look out for string buzz, or the note cutting out, also known as ‘choking’. Once you’ve ascertained there’s no buzz you’re unhappy with, do the same thing again but bend the string to make sure it’s not ‘choking’. If you find there’s too much buzz, or the notes are choking when you bend them, then you will need to make the action higher. If not, then you can either keep it as is or try to go lower. Now just rinse and repeat until you’ve got a result you’re happy with!
For more info on manufacturer specific recommended string heights, check out our in depth Telecaster Setup Page and Stratocaster Setup Page.
For Tune-O-Matic Style BridgesAll Tune-O-Matic Bridges should have the radius set in the factory, so you’ll only need to measure the low and high E strings to determine your action. Tune your guitar to pitch, measure the action at the 12th fret and make the decision as to whether you want to higher or lower your string height. With most Tune-O-Matic style bridges you adjust the action by turning the slot head screw on the bridge post, however there are some variants on that, so just be sure to use the right tool for the job to prevent any damage to the post.
Make your adjustment, again using no more than a quarter turn to ensure you can easily reverse any changes should you go too far. Re-tune the guitar to pitch then play each note of the fretboard, listening for any string buzz. Once you’ve made one pass of the fretboard ensure you do the same again, but this time bend the notes to see if any are ‘choking’ and not ringing out. It’s entirely up to you how low or high you want to go with the action, so if you want it as low as possible, keep making the adjustment incrementally until you get it how you like it.

Your Stop Bar can also be adjusted on a Tune-O-Matic Bridge. There are no hard and fast rules on this, it’s purely down to personal preference so worth some time experimenting with if you’re not happy with the way your guitar is playing. Bear in mind that this does affect the tension of the strings, so lowering the stop bar will make the strings harder to bend.
ConclusionSetting your action is definitely one of the easier adjustments you can make to your guitar, and if you’ve never done it before you may well find you open up a whole new world of playability. Many instruments are shipped set up and many aren't, but over the course of time there are plenty of things that can affect the way your guitar plays That's why to keep your guitar playing its best, it’s important to take the time out to give it some care and attention.
If you're looking to upgrade your instrument then check out all our Guitar Hardware.
Once you're done adjusting your action, you can get started on examining your Guitar Nut in Part 3 of our Guitar Set Up Guide.
More in This SeriesPart 1 - Truss Rod Adjustment
Part 2 - Adjusting the Action
Part 3 - Know Your (Guitar) Nuts
Part 4 - Keeping Things Clean
Part 5 - Intonation Adjustment
Part 6 - Pickup Height